Testing PSA
Quick Start
None of the tests for PSA are much good. Most are rather rudimentary, good only for quick QC. Others can tell you things about some key aspects of your formulation, but ignoring others that are equally important. The science says that you need peel AND probe tack AND tensile. That's not a comfortable message but is, unfortunately, true.
It would be wonderful to have a single test to characterise a PSA. But any slow test is going to be irrelevant to any fast aspect of a PSA and vice-versa. So we have a set of tests each of which reveals different aspects of a PSA but none of which provides sufficient insights on its own to help us find an optimum formulation. Here are just some of the tests used for PSA:
G', G'' at different frequencies
These tests give the most profound insight into the formulation but don't tell you anything about actual adhesion performance. Of course "different frequencies" is equivalent to "different temperatures" via WLF.
Rolling ball

Roll a known ball down a known slope and it will acquire a known momentum before it starts to run along a sample of your adhesive. The "tackier" the adhesive the shorter the distance before the ball stops. Given that "tack" is frequency dependent and that the ball's speed (frequency) changes as it slows down, it is obvious that this test is scientifically dubious. However it is an excellent quick QC test: if the ball stops at the same place that doesn't necessarily prove that the formulation is correct, but if it stops at a different place then the formulation is certainly different.
Quick tack test
A very simple 90° peel test after a light contact of an adhesive tape with a known surface. How "light" the contact is and how quickly the peel test is done and how "known" the surface actually is are all key questions. But again as a quick QC test it has its merits
Loop tack test
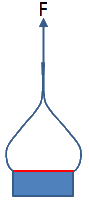
A loop of tape is lowered onto a surface of fixed contact area. Once the tape slightly overlaps the surface, the tape is raised and the peel force measured. Again, simple and readily automated for quick QC, with some potential to give more scientific data if speeds and temperatures can be changed in a systematic manner.
Full peel test
Samples are clamped with known forces, peeled at known angle (90° or 180°) with controlled speed and controlled temperature. With the right combinations of speed and temperature is is possible to cover a wide range of peel behaviours of a single PSA - from low peel at very low speeds through high peel at intermediate speeds then through stick-slip and, once more, low peel. By checking the surface for adhesive/cohesive failure a lot can be worked out scientifically. The measured value may significantly exceed the true value if you get plastic deformation in the strip you are pulling. As discuused more fully in the Peel Value page under Testing, famously, the measured peel of PI adhered to Al depends massively on whether the PI or the Al is being pulled. There is a simple calculation of a critical thickness, tc for the strip being pulled: tc=3EP/σ2
If the strip thickness is greater than tc then the measured P value is valid. If the thickness is substantially less then it is likely that recorded P is greater than the true value as a lot of your pull has gone into plastic deformation of the film. The default values are for a PET strip being pulled at 5N/m. A 12µm strip would be below the tc value of 40µm so P would be an over-estimate, but for a 50µm strip P would be valid.
PSA Testing
Here are a few typical values of E and σ for some standard materials:
| Material | Modulus GPa | σ MPa |
|---|---|---|
| Copper | 110 | 70 |
| Aluminum | 70 | 150 |
| Steel | 200 | 250 |
| Epoxy | 2.5 | 55 |
| PI | 2.5 | 70 |
| PET | 4 | 95 |
| PC | 2.5 | 65 |
| PMMA | 2 | 60 |
| PE | 0.8 | 5 |
Probe tack test
A perfect probe (which may be defined by high or low surface energy, high or low roughness) is pressed perfectly with known force into the PSA which is mounted on glass so the whole process can be videoed from beneath. The probe is pulled perfectly vertically and the forces monitored whilst the behaviour of the PSA is viewed.

This gives the deepest insights into how the PSA deforms and absorbs energy during de-bonding. The graphic shows how the stress/strain curves can reveal different things about the system, or how the same curves can be obtained via different sets of test conditions of (applied bonding) pressure, (measurement) time, (probe) roughness and (measurement) temperature. The difference between crazing and cavitation is highly significant and the degree of stringing is also insightful.
Unfortunately small differences in "perfection" in any of these steps can be magnified because the vertical pull is scientifically unstable and the de-bonding depends strongly on where cracks first start to propagate, and the velocities/frequencies can be too high to be relevant to many PSA questions. Some of these issues can be resolved by using a spherical probe surface, but this raises other issues and my personal view is to never use a spherical probe. Despite these reservations, a good formulator will learn a great deal about their system from a well-run probe tester.
Tensile Testing
My personal experience is that one learns a lot about a PSA when it is tested on its own in a standard tensile tester. The trade-offs of elastic modulus, plastic extensibility, maximum tensile stress etc. are readily apparent when different PSA samples are compared. There seems to be no official way to go from a tensile test result to a well-formulated PSA, and tensile testing is greatly under-represented in books and papers on PSA, but some highly experienced PSA formulators have confirmed that they get a lot of value from such tests.
As we will discuss in the Strength section, just about everything to do with PSA is a compromise - which is why they are so hard to get right.